KUSANAGIでLet’s Encriptを導入し常時SSLサイトにする
今月末にリリースされるchrome68以降HTTPサイトに警告が表示されてしまうので対応をしている方もいらっしゃると思います。
有料のサーバ証明をインストールするには、CSRと秘密鍵を生成>サーバ証明業者へ振込>証明書認証、発行>サーバへの設定という手順になり手間と時間がかかります。
無料のLet’s Encriptをインストールしようとすると、certbotをインストール>certbot-autoコマンドにて証明書の取得>Apache/Nginxの設定>証明書自動更新の設定といった手順になります。
KUSANAGIが導入されていればLet’s Encriptインストールはコマンド数個で完結しますので試してみました。
KUSANAGIではwp-cliを使い自動的にconfの内容やDBの情報も変えてしまいます。
万が一の為、ConfやDBのバックアップは取っておきます。
自分の環境は下記となります。
CentOS7.2+KUSANAGI7.7+nginx/1.15.0+wordpress4.7
既にKUSANAGIでサイトを構築されていてるのでLet’s Encriptを後付けでインストールします。
KUSANAGI7.7だとLet’s Encriptに対応してい無いためアップデートを行ないます。
KUSANAGI7.8より正式対応となっている様なので7.8以上の場合はアップデートは必要はありません。
sudo yum update kusanagi*
これで最新版のKUSANAGI8.2.1-2(2018/7/9現在)になりました。
下記のコマンドにてKUSANAGIコマンドにてLet’s Encriptをインストールします。
注)emailの前はハイフン2個
(kusanagi_provision名はKUSANAGIをインストールした時の名前を入力します。)
# kusanagi ssl –email メールアドレス kusanagi_provision
HTTPからHTTPSへの301 恒久的リダイレクトの設定を変更するには以下のコマンドを実行します。
# kusanagi ssl –https redirect kusanagi_provision
リダイレクトの解除を設定するには以下のコマンドを実行します。
# kusanagi ssl –https noredirect kusanagi_provision
HTST設定
kusanagi ssl –hsts weak kusanagi_provision
自分の環境だと403 Forbiddenエラーがでちゃいました。
——–
Creating virtual environment…
Installing Python packages…
Installation succeeded.
Saving debug log to /var/log/letsencrypt/letsencrypt.log
Plugins selected: Authenticator webroot, Installer None
Obtaining a new certificate
Performing the following challenges:
http-01 challenge for xxx.yyy.com
Using the webroot path /home/kusanagi/kusanagi_provision/DocumentRoot for all unmatched domains.
Waiting for verification…
Cleaning up challenges
Failed authorization procedure. xxx.yyy.com (http-01): urn:acme:error:unauthorized :: The client lacks sufficient authorization :: Invalid response from http://xxx.yyy.com/.well-known/acme-challenge/ほげほげ: “<html>
<head><title>403 Forbidden</title></head>
<body bgcolor=”white”>
<center><h1>403 Forbidden</h1></center>
<hr><center>”
To fix these errors, please make sure that your domain name was
entered correctly and the DNS A/AAAA record(s) for that domain
contain(s) the right IP address.
– Your account credentials have been saved in your Certbot
configuration directory at /etc/letsencrypt. You should make a
secure backup of this folder now. This configuration directory will
also contain certificates and private keys obtained by Certbot so
making regular backups of this folder is ideal.
Cannot get Let\’s Encrypt SSL Certificate files.
失敗しました。
——–
上手く動かない場合は下記ログを参照します。
/var/log/letsencrypt/letsencrypt.log
.well-knownにアクセス権限がない様なのでnginxのconfを以下のように修正してアクセスできる様にします。
sudo vim /etc/nginx/conf.d/kusanagi_provision_http.conf
location ^~ /.well-known/ {
allow all;
}
sudo vim /etc/nginx/conf.d/kusanagi_provision_ssl.conf
location ^~ /.well-known/ {
allow all;
}
sudo systemctl restart nginx
これでどうだ!再度下記コマンドを実行します。
# kusanagi ssl –email メールアドレス kusanagi_provision
成功すると下記のメッセージが表示されます。
——–
/etc/letsencrypt/live/xxx.yyy.com/privkey.pem
Your cert will expire on 2018-10-03. To obtain a new or tweaked
version of this certificate in the future, simply run certbot-auto
again. To non-interactively renew *all* of your certificates, run
“certbot-auto renew”
– If you like Certbot, please consider supporting our work by:
Donating to ISRG / Let’s Encrypt: https://letsencrypt.org/donate
Donating to EFF: https://eff.org/donate-le
証明書の自動更新を有効にします
nginx/httpd の設定を変更し、再起動しました。
完了しました。
——–
ssl.confがletsencryptデイレクトリ内の対象ドメイン名とプライベートキーになっている事を確認する
ssl_certificate /etc/letsencrypt/live/xxx.yyy.com/fullchain.pem;
ssl_certificate_key /etc/letsencrypt/live/xxx.yyy.com/privkey.pem;
Let’s Encriptは3ヶ月で期限が切れてしまうのでcrontabで自動更新の設定がされているか確認。
sudo crontab -l
下記の様なアップデートcronが仕込まれています。
07 03 * * 0 /usr/bin/kusanagi update cert
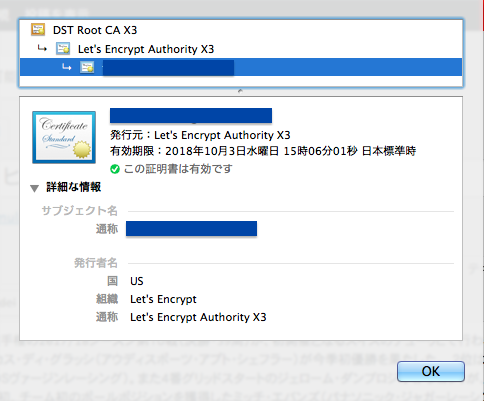
ブラウザで確認すると発行元がLet’s Encripyになってます。
自分の環境だと以下のコマンドでHTTPSへリダイレクトが出来なかったので。
# kusanagi ssl –https redirect kusanagi_provision
nginxのconfに以下を追加しリダイレクトを行いました。
return 301 https://$host$request_uri;
参考URL